發表文章

目前顯示的是 2016的文章

Adding controls/buttons to a panel-heading and pull-right on the right side - Bootstrap 3

圖片
When we want to add a button or some controls on the right side at to top of panel in Bootstrap 3, we always see the consequence as below: And the code in HTML might be like that: ........(other code) <div class="panel">     <div class="panel-heading">         <h3 class="panel-title">Social Website</h3>         <button type="button" class="btn btn-default btn-xs pull-right">     <span class="glyphicon glyphicon-plus text-primary"></span>     <span class="text-primary"><strong>Add</strong></span> </button>     </div>     <div class="panel-body">          Body     </div> .........(other code) If you want to fix the position problem, you have two very very .... easy solutions as below: Sample 1: <div class="panel panel-info" style="word-break:break-all

PHP中,SESSION何時會消失?

只要使用者登入一次,如果 server 端永遠保存 session 的內容,那使用者不就永遠不用登入了。 但是....  事實上卻不是如此! 因為 session 並不是永遠都存在著 ,只要 session 一消失,程式讀不到 session 的內容,自然會再要求使用者登入。 session 有一個「生存期限」。那麼,session 在什麼情況下會消失呢? 關閉瀏覽器並重新開啟後,session 就會消失 session 生存期限到時後,session 自動消失 PHP 預設是將瀏覽器關閉並重新開啟後,session 就自行消失,也就是 session 的 lifetime 為 0。 其實我們可以自己設定 session 的生存期限,當生存期限到期時,session 就會自動消失,而不管瀏覽器是不是被關閉並重新開啟。 什麼場合需要重設 session 的生存期限呢?例如,我們希望使用者在 30 分鐘後重新登入,我們就可以設定 session 的生存期限為 10 分鐘。 要設定 session 的生存期限,只要修改 php.ini 設定即可: session.cookie_lifetime = 0 (default value in php7) 修改這個設定項目即可。session lifetime 的預設值為 0。也就是將瀏覽器關閉並重新開啟後 session 才消失。只要將這個值改成我們要的時間即可,單位是秒: session.cookie_lifetime = 1800 (s) 設定 session 在 1800 秒後自動消失。

Firebase setting in Google Mobile Ads SDK in AdMob - Android studio

Everyone have question when user to generate a ads in AdMob. Why AdMob give me : ads-unit-id: e.g. ca-app-pub-3940256099942544/6300978111 ( a test) application-unit-id: e.g. ca-app-pub-xxxxxxxxxxxxxx~xxxxxxxxxx Before user might not need to set application-unit-id in onCreate() in java code, but now if you want use Firebase, you should use and set in java. Google Teaching: https://firebase.google.com/docs/admob/android/quick-start#project-level_buildgradle_excerpt

How to set ToolBar and replace ActionBar - Android

圖片
1. Build a XML file, toolbar.xml, in layout folder in your Android project. 2. Toolbar.xml can be like this as below for a default style. <android.support.v7.widget.Toolbar     xmlns:android="http://schemas.android.com/apk/res/android"     xmlns:local="http://schemas.android.com/apk/res-auto"     android:id="@+id/toolbar"     android:layout_width="match_parent"     android:layout_height="?attr/actionBarSize"     android:background="@color/holo_blue_dark"     local:theme="@style/ThemeOverlay.AppCompat.Dark.ActionBar"     local:popupTheme="@style/ThemeOverlay.AppCompat.Light" /> There are some important commands and do not miss them becuase they can affect the size, color,.... as you see the same with ActionBar. 3. Include toolbar.xml to the activity object you need to add the ToolBar <LinearLayout xmlns:android="http://schemas.android.com/apk/res/android"     android

Android SetTextColor work without Build.VERSION.SDK_INT checking

Normal : if ( Build.VERSION.SDK_INT >= Build.VERSION_CODES.M )  {     dynamicTextView.setTextColor(         m_ctx.getResources().getColor(  R.color.black, null ) ); }  else  {     dynamicTextView.setTextColor(         m_ctx.getResources().getColor( R.color.black ) ); } Another Way (Better) : dynamicTextView.setTextColor(      Color.parseColor(  m_ctx.getResources().getString(                                  R.color.black ) ) ); PS.  R.color.black is a value in xml file,  Color.parseColor can convert color string as #AARRGGBB or #RRGGBB.

Android 6.0 棉花糖,召喚隱藏遊戲 - 絕對不可錯過

圖片
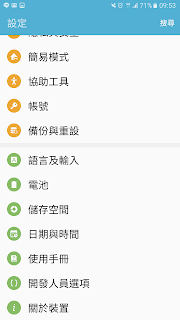
最近,我的手機才更新到Android 6.0.1版本。由於Android系統都有版本動畫的展示,所以這次我也不免俗地想點進去瞧瞧他的新「棉花糖」長的是甚麼樣子。 首先,進入「設定」,點選最後的選項「關於裝置」。 進入後,請在點擊「軟體資訊」。所有手機軟體的資訊均於此。 從下圖可視「Android版本」。接下來就在這項目上狂點吧!! 連續點擊到一個程度後,螢幕就會出現版本動畫展示囉!! 看完後,就繼續一直亂點吧!!!  然後....  意想不到的遊戲就出現了!!!! 這個遊戲有點「電流急急棒」的概念。你可以靠著點擊螢幕時間的長短,讓下墜中的Android娃娃,上升並且閃過障礙物。 Google依舊不改以前搞怪的風範,都會在自己的相關產品中,悄悄地隱藏一些逗趣的遊戲小作品,等待大家發現。

Android 中,SQLite所有資料型態對應

建立資料庫表格使用SQL的「CREATE TABLE」指令,這個指令需要指定表格的名稱,還有這個表格用來儲存每一筆資料的欄位(Column)。這些需要的表格欄位可以對應到主要類別中的欄位變數,不過SQLite資料庫的資料型態只有下面這幾種,使用它們來決定表格欄位可以儲存的資料型態: INTEGER – 整數,對應Java 的byte、short、int 和long。 REAL – 小數,對應Java 的float 和double。 TEXT – 字串,對應Java 的String。 DATETIME – 日期,對應Java 的Date。 在設計表格欄位的時候,需要設定欄位名稱和型態,表格欄位的名稱建議就使用主要類別中的欄位變數名稱。表格欄位的型態依照欄位變數的型態,把它們轉換為SQLite提供的資料型態。通常在表格欄位中還會加入「NOT NULL」的指令,表示這個表格欄位不允許空值,可以避免資料發生問題。 表格的名稱可以使用主要類別的類別名稱,一個SQLite表格建議一定要包含一個可以自動為資料編號的欄位,欄位名稱固定為「_id」,型態為「INTEGER」,後面加上「PRIMARY KEY AUTOINCREMENT」的設定,就可以讓SQLite自動為每一筆資料編號以後儲存在這個欄位。而DATETIME 也可以初始化「DEFAULT CURRENT_TIMESTAMP」,自動填入當下時間。

7-ELEVEN 電子發票明細查詢方式

圖片
想必大家都會有想要知道,自己的消費明細到底有那些。例如:剛剛在7-ELEVEN中買了那些東西。 但是,往往現在台灣的電子式發票都只有小小的一張,未必會有消費明細列舉如下圖: 除非你很明確的有在計算你買的項目是多少錢,否則從圖中是無法直接知道你剛才買了甚麼,你只會知道你花了多少錢(如圖,74元)。 不過沒關係。大家的智慧型手機中,一定都會有QRcode相關的掃描解讀APP。各位可以透過這些APP,輕鬆地知道你的消費明細,方法如下: 1. 打開你愛用的Bar-code或是QRcode掃描器。 2. 掃描電子發票中,左下角紅框中的QRcode。 3. APP解讀出信息會類似下圖。 4. 從文字中即可知道你所購買的所有品項囉!!

php 計數程式 - 總瀏覽數 [ session應用 / txt應用 ]

session_start(); $counterFile = "count.txt"; $counterizo = intval(file_get_contents($counterFile)); if($_SESSION['countizo']!=1)         //檢查SESSION {     $fp = @fopen($counterFile, "w");     if($fp)     {           flock($fp,  LOCK_EX );          fwrite($fp, ++$counterizo);           flock($fp,  LOCK_UN );          fclose($fp);          $_SESSION['countizo']=1;     // 防止重複計算     } } echo "人氣 ( ".$counterizo." )";     // 輸出

2016美國,總統候選人川普,喇叭吹頭髮遊戲網頁 - 超惡搞

圖片
2016年,美國年度風雲總統候選人,川普。他的頭髮一直都是每個美國公民們所好奇、也愛嘲諷的目標。下面的連結是現在最熱門的一個惡搞代表作品 -- 川普喇叭吹頭髮 http://trumpdonald.org/

Eclipse 軟體編輯器,風格背景、字體設定 - 超方便

圖片
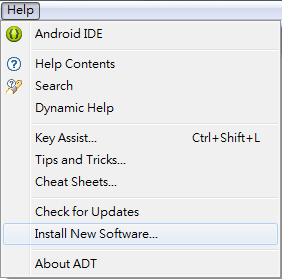
最近發現,現在有了 Eclipse Color Theme 的外掛程式,以下是步驟分享: 來源: Eclipse Color Theme http://eclipsecolorthemes.org 首先開啟 Eclipse ,然後找到選單 Help → Install New Software... 點選 Add Name 輸入 Eclipse Color Theme(可隨自己高興而取名) Location 輸入 http://eclipse-color-theme.github.com/update 按下OK,就可以看到 Eclipse Color Theme 的套件,勾選後點選 Next 按下 Next 確定安裝 勾選 I accept the terms of the license agreement, 同意授權 如果確定安裝來源沒問題,請按下OK。 安裝完畢,必須重新啟動 Eclipse,點選 Yes 接下來,我們到選單中的 Windows → Preferences 在 General → Appearance 就會出現 Color Theme 的選項,裡面就有網站上提供的各種範例可以直接下使用,並且隨時都可以切換,比起早期的方式方便。 ..... 修改字形及大小,預設的字體非等寬字,在同一個設定畫面底下 General  →  Appearance 有一個 Colors and Fonts 。 找到底下的 Text Font ,選擇後點 Edit。 Consolas識別度比較推薦,大小改為 12甚至是14都很不錯(眼睛比較不易脫窗) 按下確定後就可以觀看結果了! .... 完整的IDE風格大改變: Dark Juno - Dark UI Theme for Eclipse 4+ http://rogerdudler.github.io/eclipse-ui-themes/ 連結下載佈景主題檔案: https://github.com/downloads/rogerdudler/eclipse-ui-themes/com.github.eclipsecolortheme.themes_1.0.0.201207121019.zip 會有一個 jar

How To Create A WebView On Layout & Catch HTML code - Android Coding

One day, I needed to ensure the HTML code on mobile works, and checked every segment is ready in my WebView object. So, I found this way and share to everyone need it. This is a simple code for tutorial in Java below: @SuppressLint({ "SetJavaScriptEnabled", "JavascriptInterface" }) public class MainActivity extends Activity { private WebView mWebView; private ProgressBar mProgress; private boolean mPageLoading = false; private static final String mUrl = [ The URL you want to go ] ; @Override protected void onCreate(Bundle savedInstanceState) { super.onCreate(savedInstanceState); setContentView(R.layout.activity_main); // Initialize WebView object. mWebView = (WebView) findViewById(R.id.webview); mProgress = (ProgressBar)findViewById(R.id.progressbar); mProgress.setVisibility(View.GONE); // Make the po

How To Know The APP You Want To Start Is Installed - Android

圖片
1. If you just want a detector to ensure whether or not the app is existed, you can do this as below: public static boolean isAppInstalled(Context ctx, String packageName) {     PackageManager pm = ctx.getPackageManager();     boolean installed = false;     try {         pm.getPackageInfo(packageName, PackageManager.GET_ACTIVITIES); installed = true;     } catch (PackageManager.NameNotFoundException e) { installed = false;     }     return installed; } 2. Or, you can do this to ensure that you can find a app to get start without error as below: Intent activityIntent = new Intent(); .... (set the Intent for the Activity get ready to start.) try {     activity.startActivity( Intent.createChooser( activityIntent ,              activity.getString( "chooser title" ) ) ); } catch ( android.content.ActivityNotFoundException ex ) {     // if there is no application working, go to google play      // and install the any APP  in play store  for start

Share/Send Files to Google Drive via share-button - Android

ArrayList<Uri> fileURIs = [ uris of files in mobile device ] Intent shareIntent = new Intent(); shareIntent.setAction( Intent.ACTION_SEND_MULTIPLE ); shareIntent.putExtra( Intent.EXTRA_SUBJECT, [ subject text ] ); shareIntent.putExtra( Intent.EXTRA_TEXT, [ contents text ] ); shareIntent.putParcelableArrayListExtra(Intent.EXTRA_STREAM, fileURIs ); shareIntent.setType( "text/*" );    // set the type you want // Google Drive package name :  com.google.android.apps.docs shareIntent.setPackage(" com.google.android.apps.docs "); // It will start the Google Drive APP. activity.startActivity( shareIntent );

Good Regex Detecting for Website URL, ISBN, GUID - Java

// web site url public static boolean WebsiteURL(final String str) {     if(str == null) return false;     String regex = " ^(https?|ftp|file)://[-a-zA-Z0-9+&@#/%?=~_|!:,.;]*[-a-zA-Z0-9+&@#/%=~_|] ";     Pattern pattern = Pattern.compile( regex );     return pattern.matcher( str.toString() ).matches(); }     // ISBN 國際標準書號 public static boolean LibraryISBN(final String str) {     if(str == null) return false;         String regex = " ^(/d[- ]*){9}[/dxX]$ ";     Pattern pattern = Pattern.compile( regex );     return pattern.matcher( str.toString() ).matches(); }     // GUID 全球唯一標識符 public static boolean GUID(final String str) {     if(str == null) return false;         String regex = " ^[0-9a-f]{8}-[0-9a-f]{4}-[1-5][0-9a-f]{3}-[89ab][0-9a-f]{3}-[0-9a-f]{12}$ ";     Pattern pattern = Pattern.compile( regex );     return pattern.matcher( str.toString() ).matches(); }

How to detect email address format - Android, Java coding

1. First import java.util.regex.Pattern. 2. Email regex is ^[_A-Za-z0-9-\\+]+(\\.[_A-Za-z0-9-]+)*@[A-Za-z0-9-]+(\\.[A-Za-z0-9]+)*(\\.[A-Za-z]{2,})$ 3. Use Pattern.compile( [email regex string] ). Finally, coding method like below. public static boolean checkEmail( final String mail ) {     if( mail != null )     {         String EMAIL_PATTERN = " ^[_A-Za-z0-9-\\+]+(\\.[_A-Za-z0-9-]+)*@[A-Za-z0-9-]+(\\.[A-Za-z0-9]+)*(\\.[A-Za-z]{2,})$ ";     Pattern pattern = Pattern.compile( EMAIL_PATTERN ) ;     return pattern.matcher( mail ).matches() ;     }     return false; }